
Directions For The Belt.
I collected 200 tabs, raiding my neighbors recycling bins in the dark of night, and ended up using 125-150 of them. I bought 5 yards of nylon cord and used all of it. It took 60-90 minutes to make.
First I found the center point of the cord and tied a knot about 8 inches in.

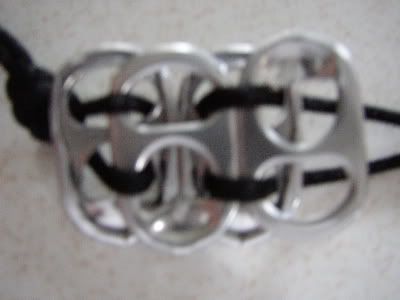
I then threaded my first can tab on, I consider this the front.

I threaded on my second tab whick will be the back of the belt. I put rough edges facing in toward each other.


this is the back view

I then put on the second "front" tab crossing the cord to make an x....like cross stitch

The back view of this step

Thread the second "back" tab on
Come up through the holes on the front tab

Continue by doing the cross stitch on front

Voila!
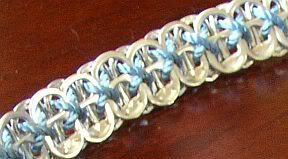
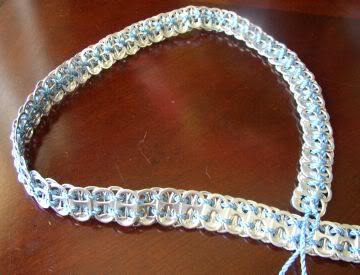
I hope this is helpful. Once you get the hang of it it goes quickly.....and is addictive. You've been warned.
21 comments:
i LOVE my new belt! thanks.
OH thats a wonderful idea!
Great idea. Truly innovative. Now I know what to do with those pesky tabs!
Hello, I have been searching for your e-mail. You contributed a soda can image to my website http://www.Craftbits.com and wondered wether you would be able to help me out with some more photos. please contact me at staff@craftbits.com
I'm blown away by this. I love it.
you are kidding?!!! That is amazing. Reminds me of what people used to do with gum wrappers.......I never learned that either.
Thank you so much :D
I just made this as a bracelet for my girlfriend and she loves it!
I DID IT!! I finally finished the belt. Now I have tomake another in a different color.
Your instructions were the best.
Thanks again.
Hey umm yea I love the belt idea but do you by chance know how to make a purse? If so can you tell me how at villefan13@hotmail.com
Why do u put a not in the center?
Also how do u tie the belt to make it fit? I am confused and would like for u to email me so i can make it at jent13@gmail.com
i must say, i wanted to make a piece of jewlrey for my boyfriend before he went off to college and i couldn't for the life of me find something ergonomical and manly (i'm a green crafter!) but he wears the bracelet i made him all the time!
what if i wanted to make my belt wider?? how do i do that?
It's really so pretty! I was quite surprised at the end result. Thanks for sharing your ideas. :o)
This is one of the most ingenius ideas I've seen in a long time! I thought it'd be interesting to use elastic and it worked really well for a bracelett
So for some reason me and my friends have been having a competition to see who can collect the most pop tabs. I've been stringing them up on a shoe lace and tying them onto my purse. when i saw this...i freaked!!!! GREAT IDEA TO SHOW OFF I'M WINNING! =]]
wow that's amazing... I just recently made a bracelet with this technique. I love it! I was just wondering... it wasn't very clear as to how you're supposed to finish it and then make some sort of buckle/closure.
I'm Chilean, so sorry my language.
it is very nice and easy, I treated to make a bag with other technique but this is fantastic!!!!
I love this
thank you very much
Question: why did you alternate the "top" of the tabs on the backside? (pic 8). Thanks for sharing your directions btw.
Elise, it was a mistake...I fixed it in the following picture:)
Thanks for sharing such a good post, its very helpful.
Study abroad education loan
sbi education loan
Bank of baroda education loan
Loans for students studying abroad
Loan for study abroad
Thanks for sharing such a good post, its very helpful.
best hotel management
hospitality courses in mumbai
Post a Comment